Istio 101 (1.0) on GKE

Istio 1.0 is finally announced! In this post, I updated my previous Istio 101 post with Istio 1.0 specific instructions. Most of the instructions are the same but with a few minor differences about where things live (folder names/locations changed) and also most commands now default to kubectl instead of istioctl.

For those of you who haven’t read my Istio 101 post, I show how to install Istio 1.0 on Google Kubernetes Engine (GKE), deploy the sample BookInfo app and show some of the add-ons and traffic routing.

Create Kubernetes cluster

First, we need a Kubernetes cluster to install Istio. On GKE, this is a single command:

gcloud container clusters create hello-istio \
 --cluster-version=latest \
 --zone europe-west1-b \
 --num-nodes 4

I’m using 4 worker nodes. That’s the recommended number of nodes for BookInfo sample.

Once the cluster is created, we also need to create a clusterrolebinding for Istio to be able to manage the cluster:

kubectl create clusterrolebinding cluster-admin-binding \
 --clusterrole=cluster-admin \
 --user=$(gcloud config get-value core/account)

Download & Setup Istio

Now that we have a cluster, let’s download the latest Istio (1.0.0 as of today):

curl -L https://git.io/getLatestIstio | ISTIO_VERSION=1.0.0 sh -

Add Istio’s command line tool istioctl to your PATH. We’ll need it later:

export PATH="$PATH:./istio-1.0.0/bin"

Install Istio

It’s time to install Istio with mutual authentication between sidecars:

kubectl apply -f install/kubernetes/istio-demo-auth.yaml

Once it’s done, you can check that pods are running under istio-system namespace:

kubectl get pods -n istio-system

You’ll realize that in addition to Istio base components (eg. pilot, mixer, ingress, egress), a number of add-ons are also installed (eg. prometheus, servicegraph, grafana). This is different from the previous versions of Istio.

Enable sidecar injection

When we configure and run the services, Envoy sidecars can be automatically injected into each pod for the service. For that to work, we need to enable sidecar injection for the namespace (‘default’) that we will use for our microservices. We do that by applying a label:

kubectl label namespace default istio-injection=enabled

And verify that label was successfully applied:

kubectl get namespace -L istio-injection

Deploy BookInfo app

Let’s deploy the BookInfo sample app now:

kubectl apply -f samples/bookinfo/platform/kube/bookinfo.yaml

And make sure all the pods are running. Notice that there are 2 pods for each service (1 the actual service and 1 sidecar):

kubectl get pods

Deploy BookInfo Gateway

In Istio 1.0.0, you need to create a gateway for ingress traffic. Let’s go ahead and create a gateway for BookInfo app:

kubectl apply -f samples/bookinfo/networking/bookinfo-gateway.yaml

Use BookInfo app

We can finally take a look at the app. We need to find ingress gateway IP and port:

kubectl get svc istio-ingressgateway -n istio-system

To make it easier for us, let’s define a GATEWAY_URL variable:

export INGRESS_HOST=$(kubectl -n istio-system get service istio-ingressgateway -o jsonpath='{.status.loadBalancer.ingress[0].ip}')
export INGRESS_PORT=$(kubectl -n istio-system get service istio-ingressgateway -o jsonpath='{.spec.ports[?(@.name=="http2")].port}')
export GATEWAY_URL=$INGRESS_HOST:$INGRESS_PORT

Let’s see if the app is working. You should get 200 with curl:

curl -o /dev/null -s -w "%{http_code}\n" http://${GATEWAY_URL}/productpage

You can also open a browser and see the web frontend for product page. At this point, we got the app deployed and managed by a basic installation of Istio.

Next, we’ll take a look at some of the add-ons. Unlike previous versions, add-ons are automatically installed already. Let’s start sending some traffic first:

for i in {1..100}; do curl -o /dev/null -s -w "%{http_code}\n" http://${GATEWAY_URL}/productpage; done

Grafana dashboard

There’s Grafana for dashboarding. Let’s setup port forwarding first:

kubectl -n istio-system port-forward $(kubectl -n istio-system get pod -l app=grafana -o jsonpath='{.items[0].metadata.name}') 8080:3000

Navigate to http://localhost:8080 to see the dashboard:
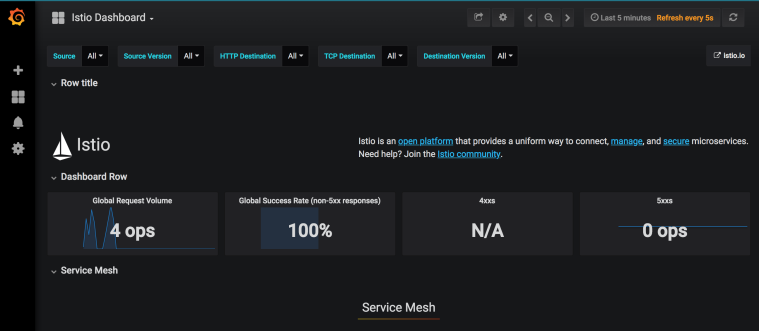
Istio Dashboard in Grafana

Prometheus metrics

Next, let’s take a look at Prometheus for metrics. Set port forwarding:

kubectl -n istio-system port-forward $(kubectl -n istio-system get pod -l app=prometheus -o jsonpath='{.items[0].metadata.name}') 8083:9090

Navigate to http://localhost:8083/graph to see Prometheus:
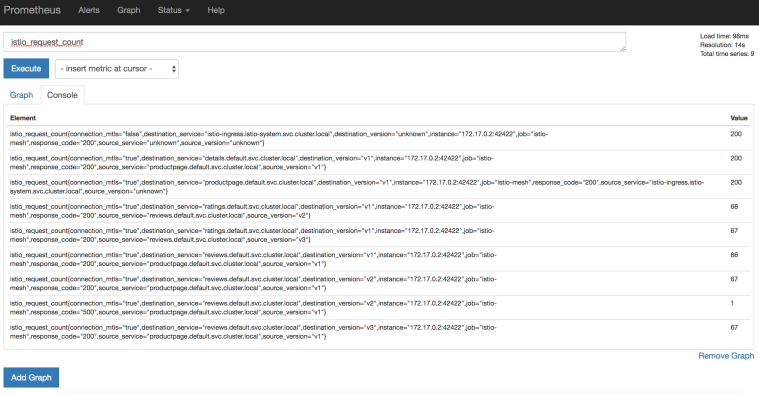
Prometheus in Istio

ServiceGraph

For dependency visualization, we can take a look at ServiceGraph:

kubectl -n istio-system port-forward $(kubectl -n istio-system get pod -l app=servicegraph -o jsonpath='{.items[0].metadata.name}') 8082:8088

Navigate to http://localhost:8082/dotviz:
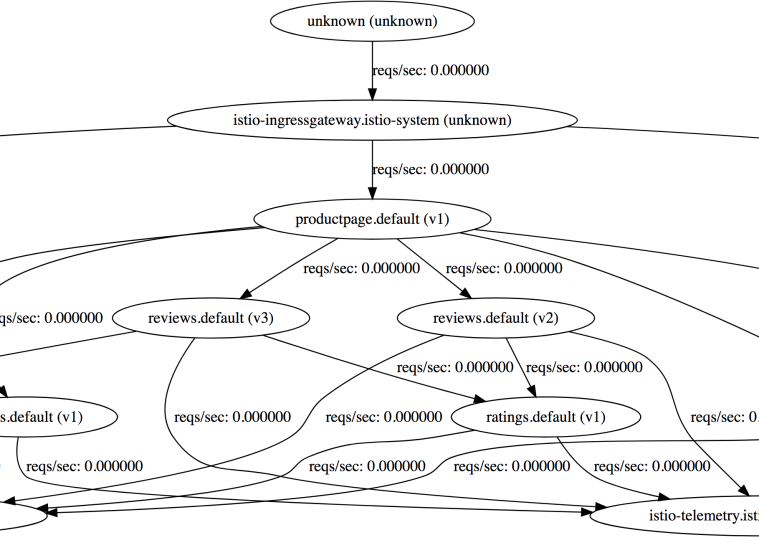
Screen Shot 2018-06-07 at 10.02.38 AM.png

Tracing

For HTTP tracing, there is Jaegar and Zipkin. Let’s take a look at Jaeger. Setup port forwarding as usual:

kubectl port-forward -n istio-system $(kubectl get pod -n istio-system -l app=jaeger -o jsonpath='{.items[0].metadata.name}') 8084:16686

Navigate to http://localhost:8084
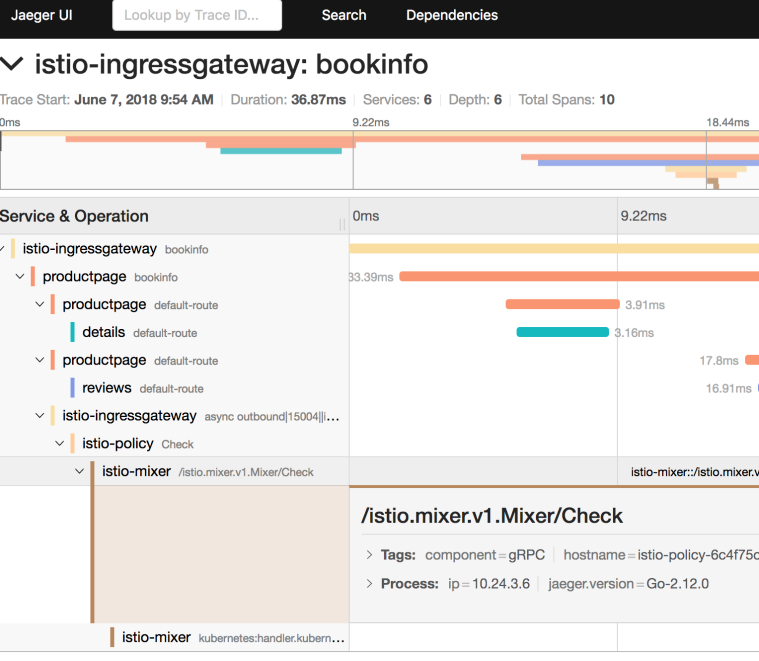
Screen Shot 2018-06-07 at 10.05.11 AM

Traffic Management

Before you can use Istio to control the Bookinfo version routing, you need to define the available versions, called subsets, in destination rules. Run the following command to create default destination rules for the Bookinfo services:

kubectl apply -f samples/bookinfo/networking/destination-rule-all-mtls.yaml

You can then see the existing VirtualServices and DestinationRules like this:

kubectl get virtualservices -o yaml
kubectl get destinationrules -o yaml

When you go to the product page of BookInfo application and do a browser refresh a few times, you will see that the reviews section on the right keeps changing (the stars change color). This is because there are 3 different reviews microservices and everytime, a different microservice is invoked. Let’s pin all microservices to version1:

kubectl apply -f samples/bookinfo/networking/virtual-service-all-v1.yaml

This creates VirtualServices and DestinationRules needed to pin all microservices to version1. Now, if you back to the product page and do a browser refresh, nothing changes because reviews microservice is pinned to version1 now.

To pin a specific user (eg. Jason) to a specific version (v2), we can do the following:

kubectl apply -f samples/bookinfo/networking/virtual-service-reviews-test-v2.yaml

With this rule, if you login to the product page with username “Jason”, you should see the v2 version of reviews microservice.

To clean up all destination rules, run the following and now we’re back to the beginning with 3 different versions of the microservices:

kubectl delete -f samples/bookinfo/networking/virtual-service-all-v1.yaml

Cleanup

This wraps up all the basic functionality of Istio 1.0.0 that I wanted to show on GKE. To cleanup, let’s first delete the BookInfo app:

kubectl delete -f samples/bookinfo/networking/bookinfo-gateway.yaml
kubectl delete -f samples/bookinfo/platform/kube/bookinfo.yaml

Confirm that BookInfo app is gone:

kubectl get gateway
kubectl get virtualservices
kubectl get pods

Finally, cleanup Istio:

kubectl delete -f install/kubernetes/istio-demo.yaml

Confirm that Istio is gone:

kubectl get pods -n istio-system

Istio 101 (0.8.0) on GKE

In one of my previous posts, I showed how to install Istio on minikube and deploy the sample BookInfo app. A new Istio version is out (0.8.0) with a lot of changes, especially changes on traffic management, which made my steps in the previous post a little obsolete.

In this post, I want to show how to install Istio 0.8.0 on Google Kubernetes Engine (GKE), deploy the sample BookInfo app and show some of the add-ons and traffic routing.

Create Kubernetes cluster

First, we need a Kubernetes cluster to install Istio. On GKE, this is a single command:

gcloud container clusters create hello-istio \
 --cluster-version=latest \
 --zone europe-west1-b \
 --num-nodes 4

I’m using 4 worker nodes. That’s the recommended number of nodes for BookInfo sample.

Once the cluster is created, we also need to create a clusterrolebinding for Istio to be able to manage the cluster:

kubectl create clusterrolebinding cluster-admin-binding \
 --clusterrole=cluster-admin \
 --user=$(gcloud config get-value core/account)

Download & Setup Istio

Now that we have a cluster, let’s download the latest Istio (0.8.0 as of today):

curl -L https://git.io/getLatestIstio | ISTIO_VERSION=0.8.0 sh -

Add Istio’s command line tool istioctl to your PATH. We’ll need it later:

export PATH="$PATH:./istio-0.8.0/bin"

Install Istio

It’s time to install Istio with mutual authentication between sidecars:

kubectl apply -f install/kubernetes/istio-demo-auth.yaml

Once it’s done, you can check that pods are running under istio-system namespace:

kubectl get pods -n istio-system

You’ll realize that in addition to Istio base components (eg. pilot, mixer, ingress, egress), a number of add-ons are also installed (eg. prometheus, servicegraph, grafana). This is different from the previous versions of Istio.

Enable sidecar injection

When we configure and run the services, Envoy sidecars can be automatically injected into each pod for the service. For that to work, we need to enable sidecar injection for the namespace (‘default’) that we will use for our microservices. We do that by applying a label:

kubectl label namespace default istio-injection=enabled

And verify that label was successfully applied:

kubectl get namespace -L istio-injection

Deploy BookInfo app

Let’s deploy the BookInfo sample app now:

kubectl apply -f samples/bookinfo/kube/bookinfo.yaml

And make sure all the pods are running. Notice that there are 2 pods for each service (1 the actual service and 1 sidecar):

kubectl get pods

Deploy BookInfo Gateway

In Istio 0.8.0, traffic management completely changed and one of those changes is that you need to create a gateway for ingress traffic. Let’s go ahead and create a gateway for BookInfo app:

istioctl create -f samples/bookinfo/routing/bookinfo-gateway.yaml

Use BookInfo app

We can finally take a look at the app. We need to find ingress gateway IP and port:

kubectl get svc istio-ingressgateway -n istio-system

To make it easier for us, let’s define a GATEWAY_URL variable:

export INGRESS_HOST=$(kubectl -n istio-system get service istio-ingressgateway -o jsonpath='{.status.loadBalancer.ingress[0].ip}')
export INGRESS_PORT=$(kubectl -n istio-system get service istio-ingressgateway -o jsonpath='{.spec.ports[?(@.name=="http")].port}')
export GATEWAY_URL=$INGRESS_HOST:$INGRESS_PORT

Let’s see if the app is working. You should get 200 with curl:

curl -o /dev/null -s -w "%{http_code}\n" http://${GATEWAY_URL}/productpage

You can also open a browser and see the web frontend for product page. At this point, we got the app deployed and managed by a basic installation of Istio.

Next, we’ll take a look at some of the add-ons. Unlike previous versions, add-ons are automatically installed already. Let’s start sending some traffic first:

for i in {1..100}; do curl -o /dev/null -s -w "%{http_code}\n" http://${GATEWAY_URL}/productpage; done

Grafana dashboard

There’s Grafana for dashboarding. Let’s setup port forwarding first:

kubectl -n istio-system port-forward $(kubectl -n istio-system get pod -l app=grafana -o jsonpath='{.items[0].metadata.name}') 8080:3000

Navigate to http://localhost:8080 to see the dashboard:

Istio Dashboard in Grafana

Prometheus metrics

Next, let’s take a look at Prometheus for metrics. Set port forwarding:

kubectl -n istio-system port-forward $(kubectl -n istio-system get pod -l app=prometheus -o jsonpath='{.items[0].metadata.name}') 8083:9090

Navigate to http://localhost:8083/graph to see Prometheus:

Prometheus in Istio

ServiceGraph

For dependency visualization, we can take a look at ServiceGraph:

kubectl -n istio-system port-forward $(kubectl -n istio-system get pod -l app=servicegraph -o jsonpath='{.items[0].metadata.name}') 8082:8088

Navigate to http://localhost:8082/dotviz:

Screen Shot 2018-06-07 at 10.02.38 AM.png

Tracing

For HTTP tracing, there is Jaegar and Zipkin. Let’s take a look at Jaeger. Setup port forwarding as usual:

kubectl port-forward -n istio-system $(kubectl get pod -n istio-system -l app=jaeger -o jsonpath='{.items[0].metadata.name}') 8084:16686

Navigate to http://localhost:8084

Screen Shot 2018-06-07 at 10.05.11 AM

Traffic Management

Traffic Management changed dramatically in 0.8.0. You can read more about it here but basically instead of routing rules, we now have VirtualServices and DestinationRules.

You can see the existing VirtualServices and DestinationRules like this:

istioctl get virtualservices -o yaml
istioctl get destinationrules -o yaml

When you go to the product page of BookInfo application and do a browser refresh a few times, you will see that the reviews section on the right keeps changing (the stars change color). This is because there are 3 different reviews microservices and everytime, a different microservice is invoked. Let’s pin all microservices to version1:

istioctl create -f samples/bookinfo/routing/route-rule-all-v1-mtls.yaml

This creates VirtualServices and DestinationRules needed to pin all microservices to version1. Now, if you back to the product page and do a browser refresh, nothing changes because reviews microservice is pinned to version1 now.

To pin a specific user (eg. Jason) to a specific version (v2), we can do the following:

istioctl replace -f samples/bookinfo/routing/route-rule-reviews-test-v2.yaml

With this rule, if you login to the product page with username “Jason”, you should see the v2 version of reviews microservice.

To clean up all destination rules, run the following and now we’re back to the beginning with 3 different versions of the microservices:

istioctl delete -f samples/bookinfo/routing/route-rule-all-v1.yaml

Cleanup

This wraps up all the basic functionality of Istio 0.8.0 that I wanted to show on GKE. To cleanup, let’s first delete the BookInfo app:

samples/bookinfo/kube/cleanup.sh

Confirm that BookInfo app is gone:

istioctl get gateway
istioctl get virtualservices
kubectl get pods

Finally, cleanup Istio:

kubectl delete -f install/kubernetes/istio-demo.yaml

Confirm that Istio is gone:

kubectl get pods -n istio-system

Istio + Kubernetes on Windows

23534644

I’ve been recently looking into Istio, an open platform to connect and manage microservices. After Containers and Kubernetes, I believe that Istio is the next step in our microservices journey where we standardize on tools and methods on how to manage and secure microservices. Naturally, I was very excited to get my hands on Istio.

While setting up Istio on Google Kubernetes Engine (GKE) is pretty straightforward, it’s always useful to have a local setup for debugging and testing. I specifically wanted to setup Istio on my local Minikube Kubernetes cluster on my Windows machine. I ran into a few minor issues that I want to outline here in case it is useful to someone out there.

I assume you have a Minikube cluster setup already and running. If not, you can check out my previous post on how to setup and run a Minikube cluster on your Windows machine. Istio has a Quickstart tutorial for Kubernetes. I’ll follow that but it’s Linux-centric and some of the commands have to be adopted for Windows.

Download Istio

Here is the command to download Istio from Quickstart:

curl -L https://git.io/getLatestIstio | sh -

This is a Linux shell command and it won’t work on Windows cmd or PowerShell. Thankfully, someone already wrote an equivalent PowerShell script here. I used the script as is, only changed the IstioVersion to 0.5.1, the latest Istio version as of today:

param(
 [string] $IstioVersion = "0.5.1"
)

The script downloads Istio and sets an ISTIO_HOME as environment variable.

PS C:\dev\local\istio> .\getLatestIstio.ps1
Downloading Istio from https://github.com/istio/istio/releases/download/
0.5.1/istio_0.5.1_win.zip to path C:\dev\local\istio

Then, I added %ISTIO_HOME%\bin to PATH  to make sure I can run istoctl commands.

Install and Verify Istio

To install Istio and enable mutual TLS authentication between sidecars, I ran the same command in the quickstart:

PS C:\istio-0.5.1> kubectl apply -f install/kubernetes/istio-auth.yaml
namespace "istio-system" created
clusterrole "istio-pilot-istio-system" created
clusterrole "istio-sidecar-injector-istio-system" created
clusterrole "istio-mixer-istio-system" created
clusterrole "istio-ca-istio-system" created
clusterrole "istio-sidecar-istio-system" created

And verify that all the Istio pods are running:

PS C:\istio-0.5.1> kubectl get pods -n istio-system
NAME                           READY STATUS  RESTARTS AGE
istio-ca-797dfb66c5-x4bzs      1/1   Running  0       2m
istio-ingress-84f75844c4-dc4f9 1/1   Running  0       2m
istio-mixer-9bf85fc68-z57nq    3/3   Running  0       2m
istio-pilot-575679c565-wpcrf   /2    Running  0       2m

Deploy the sample app

Deploying an app is a little different on Windows as well. To deploy the BookSample app with Envoy container injection, this is the command you would normally run on Linux:

kubectl create -f <(istioctl kube-inject -f samples/bookinfo/kube/bookinfo.yaml)

The redirection causes problems on PowerShell. Instead, you can first run the istioctl command and save it to an intermediate yaml:

istioctl kube-inject -f .\samples\bookinfo\kube\bookinfo.yaml > bookinfo_inject.yaml

Then, you can apply the intermediate yaml:

PS C:\istio-0.5.1> kubectl create -f .\bookinfo_inject.yaml
service "details" created
deployment "details-v1" created
service "ratings" created
deployment "ratings-v1" created
service "reviews" created
deployment "reviews-v1" created
deployment "reviews-v2" created
deployment "reviews-v3" created
service "productpage" created
deployment "productpage-v1" created
ingress "gateway" created


With that, you will have BookInfo app deployed and managed by Istio. Hope this was useful to get Istio + Kubernetes running in Minikube on Windows.

From the Monolith to Microservices

I remember the old days where we used to package all our modules into a single app (aka the Monolith), deployed everything all at once and called it an enterprise app. I have to admit, the first time I heard the term enterprise app, it felt special. Suddenly, my little module was not so little anymore. It was part of something bigger and more important, at least that’s what I thought. There was a lot of convention and overhead that came with working in this enterprise app model but it was a small price to pay for consistency, right?

This approach worked for small projects with small number of modules. As the projects got bigger and the number of teams and modules involved increased, it became obvious to me that the monolith approach wasn’t scalable anymore for a number of reasons.

  1. Integration was way too difficult. To create a single app, we had to bundle a number of modules and that was not only difficult but it always happened too late in the release cycle. This meant that we didn’t really test our integrated app end-to-end very late in the release cycle. Integration time was a constant cause of stress.
  2. Not agile at all. We had to wait for the slowest module to finish its development cycle before we can release any of our modules. This wasn’t agile at all.
  3. Debugging was way too difficult. I could debug my module on its own but debugging the whole app with all the modules was almost impossible. I didn’t have access to the source code of other modules and the whole app was so heavy that I could not run it on my laptop anyway.
  4. Environmental inconsistencies. Everything worked fine on my laptop but the production environment was always slightly different and caused hard-to-debug and hard-to-anticipate bugs.

In the last few years, a number of things happened that helped with these problems. The industry came to the realisation that the Monotith approach is not scalable and there was a shift towards smaller manageable microservices. This took care of the integration, debugging and agility issues. Docker provided a consistent context for those microservices. This took care of the environmental inconsistency problem.

But we still needed to run containers in production and deal all the issues that come with it. We had to find a way to provision nodes for containers. We had to make sure that containers are up and running. We had to do reliable rollouts and rollbacks. We had to write health checks and all the other things we need to do to run software in production.

Thankfully, we started seeing open-source container management platforms like Kubernetes. Kubernetes provided us a high level API to automate deployments, manage rollouts/rollbacks, scale up/down and much more. The best thing is that Kubernetes runs anywhere from your laptop to the cloud and it can span multiple clouds so there is no lock-in.

As a result, I feel like we brought some sanity back in how we build and run software and that’s always a good thing!