Dialogflow fulfillment with C# and App Engine

Dialogflow

Dialogflow is a developer platform for building voice or text-based conversational apps on a number of platforms such as Google Assistant, Facebook Messenger, Twilio, Skype and more. Earlier this year, we used Dialogflow to build a Google Assistant app and extended it to use the power of Google Cloud. You can read more about it on Google Cloud blog here, see the app code on GitHub here and one of my talk videos about the app is here.

Out of the box, Dialogflow provides features such as intents for matching user input to responses, entities to extract relevant information from conversations, contexts to maintain the state of the conversation. It also provides a way to extend its functionality via fulfillments.

Fulfillment

A fulfillment is a HTTPS webhook that Dialogflow can forward requests to. From then on, your code is in charge of handling the request and generating a response. This is very useful for having custom logic or introducing further intelligence/data to your app. In our app, we used fulfillment to search for images using Google Custom Search, used Vision API to analyze images with Machine Learning and performed rich data analysis with BigQuery.

An easy way of implementing a fulfillment webhook is via the Inline Editor in Dialogflow console. Inline Editor enables you to write a Node.js function to handle Dialogflow requests and deploy it to Cloud Functions with Firebase (see this codelab for details). While Inline Editor is easy, it only allows a single webhook and it’s not developer friendly. Ideally, you’d develop code locally and use some kind of version control.

You can setup a local environment and use Firebase to deploy the function to Cloud Function (this codelab shows how). While this is a more realistic setup, it’s still constrained by Cloud Functions limitations and Node.js is the only language you can use.

AppEngine for fulfillment

In our app, we took a different approach to implement the webhook. Instead of Node.js, we decided to use C# and instead of Cloud Functions, we containerized our app and deployed to App Engine for more flexibility.

Since it’s a container, we could have deployed to Kubernetes Engine as well but we chose App Engine because:

  1. App Engine gives us a HTTPS endpoint out of the box with minimal hassle whereas Kubernetes Engine HTTPS setup is not trivial.
  2. Versioning in App Engine allowed us to update and deploy our app easily, test it out and forward all the traffic to the new version when we’re ready.

HelloWorld fulfillment with C#

To give you an idea on how to write a Dialogflow fulfillment on AppEngine using C#, let’s write a HelloWorld fulfillment webhook.

First, you need to first create an ASP.NET Core web app:

dotnet new web -n fulfillment

And add Dialogflow NuGet package to the project. This package will allow us to parse requests from Dialogflow and generate responses:

dotnet add package Google.Cloud.Dialogflow.V2 --version 1.0.0-beta02

Now, we can edit Startup.cs file and add logic to handle Dialogflow requests. We need to first refer to Dialogflow NuGet library and some of its dependencies:

using Google.Cloud.Dialogflow.V2;
using Google.Protobuf;
using System.IO;

Then, we need to create a Protobuf jsonParser that we’ll use to parse the body of HTTP requests:

private static readonly JsonParser jsonParser = 
   new JsonParser(JsonParser.Settings.Default.WithIgnoreUnknownFields(true));

Finally, let’s change the Configure method to parse the request from Dialogflow and simply echo back with a Hello message with the intent name:

app.Run(async (context) =>
{
    WebhookRequest request;

    using (var reader = new StreamReader(context.Request.Body))
    {
         request = jsonParser.Parse<WebhookRequest>(reader);
    }

    var response = new WebhookResponse
    {
        FulfillmentText = "Hello from " + request.QueryResult.Intent.DisplayName
    };

    await context.Response.WriteAsync(response.ToString());
});

Notice how the HTTP request body is parsed as a WebhookRequest. This is the request Dialogflow sends to our code. In response, we create a WebhookResponse with FulfillmentText and send back. Dialogflow will use the FulfillmentText to say what we asked.

Deploy to App Engine

Now, we’re ready to deploy our code to App Engine. We need to publish the app first:

dotnet publish -c Release

This will create a DLL inside the bin/Release/netcoreapp2.0/publish/ folder. Inside this folder, create an app.yaml file for App Engine with the following contents:

env: flex
runtime: aspnetcore

This will tell App Engine that this is an ASP.NET Core app and it should deploy to App Engine flex.

Finally, deploy to App Engine and let’s call this initial version v0:

gcloud app deploy --version v0

Once the deployment is done, you will have an HTTPS endpoint in the form of https://<yourprojectid&gt;.appspot.com that you can use a fulfillment webhook in Dialogflow.

Test with Dialogflow

We’re finally ready to test our fulfillment webhook. In Dialogflow console, specify fulfillment url:

fulfillment

Then, create an intent with some training phrases:

intent

Finally, make sure the fulfillment webhook is enabled for the intent:

webhook

We can use the simulator in Dialogflow console to test out the intent:

hello .net

When we say “Hello .NET”, this triggers the webhook and our webhook code simply echoes back the intent name which is “hello c# intent” in this case.

Obviously, a real world webhook would do much more than a simple reply. For example, you would need to keep track of user sessions and get or create conversations based on those sessions (see DialogflowApp of our app on GitHub). You also need to find a way to match intents to handlers on the server (see Conversation of our app on GitHub on this).

Hopefully, this blog post provided the basics to get started with fulfillment webhook using C# and App Engine.


Istio 101 (1.0) on GKE

Istio 1.0 is finally announced! In this post, I updated my previous Istio 101 post with Istio 1.0 specific instructions. Most of the instructions are the same but with a few minor differences about where things live (folder names/locations changed) and also most commands now default to kubectl instead of istioctl.

For those of you who haven’t read my Istio 101 post, I show how to install Istio 1.0 on Google Kubernetes Engine (GKE), deploy the sample BookInfo app and show some of the add-ons and traffic routing.

Create Kubernetes cluster

First, we need a Kubernetes cluster to install Istio. On GKE, this is a single command:

gcloud container clusters create hello-istio \
 --cluster-version=latest \
 --zone europe-west1-b \
 --num-nodes 4

I’m using 4 worker nodes. That’s the recommended number of nodes for BookInfo sample.

Once the cluster is created, we also need to create a clusterrolebinding for Istio to be able to manage the cluster:

kubectl create clusterrolebinding cluster-admin-binding \
 --clusterrole=cluster-admin \
 --user=$(gcloud config get-value core/account)

Download & Setup Istio

Now that we have a cluster, let’s download the latest Istio (1.0.0 as of today):

curl -L https://git.io/getLatestIstio | ISTIO_VERSION=1.0.0 sh -

Add Istio’s command line tool istioctl to your PATH. We’ll need it later:

export PATH="$PATH:./istio-1.0.0/bin"

Install Istio

It’s time to install Istio with mutual authentication between sidecars:

kubectl apply -f install/kubernetes/istio-demo-auth.yaml

Once it’s done, you can check that pods are running under istio-system namespace:

kubectl get pods -n istio-system

You’ll realize that in addition to Istio base components (eg. pilot, mixer, ingress, egress), a number of add-ons are also installed (eg. prometheus, servicegraph, grafana). This is different from the previous versions of Istio.

Enable sidecar injection

When we configure and run the services, Envoy sidecars can be automatically injected into each pod for the service. For that to work, we need to enable sidecar injection for the namespace (‘default’) that we will use for our microservices. We do that by applying a label:

kubectl label namespace default istio-injection=enabled

And verify that label was successfully applied:

kubectl get namespace -L istio-injection

Deploy BookInfo app

Let’s deploy the BookInfo sample app now:

kubectl apply -f samples/bookinfo/platform/kube/bookinfo.yaml

And make sure all the pods are running. Notice that there are 2 pods for each service (1 the actual service and 1 sidecar):

kubectl get pods

Deploy BookInfo Gateway

In Istio 1.0.0, you need to create a gateway for ingress traffic. Let’s go ahead and create a gateway for BookInfo app:

kubectl apply -f samples/bookinfo/networking/bookinfo-gateway.yaml

Use BookInfo app

We can finally take a look at the app. We need to find ingress gateway IP and port:

kubectl get svc istio-ingressgateway -n istio-system

To make it easier for us, let’s define a GATEWAY_URL variable:

export INGRESS_HOST=$(kubectl -n istio-system get service istio-ingressgateway -o jsonpath='{.status.loadBalancer.ingress[0].ip}')
export INGRESS_PORT=$(kubectl -n istio-system get service istio-ingressgateway -o jsonpath='{.spec.ports[?(@.name=="http2")].port}')
export GATEWAY_URL=$INGRESS_HOST:$INGRESS_PORT

Let’s see if the app is working. You should get 200 with curl:

curl -o /dev/null -s -w "%{http_code}\n" http://${GATEWAY_URL}/productpage

You can also open a browser and see the web frontend for product page. At this point, we got the app deployed and managed by a basic installation of Istio.

Next, we’ll take a look at some of the add-ons. Unlike previous versions, add-ons are automatically installed already. Let’s start sending some traffic first:

for i in {1..100}; do curl -o /dev/null -s -w "%{http_code}\n" http://${GATEWAY_URL}/productpage; done

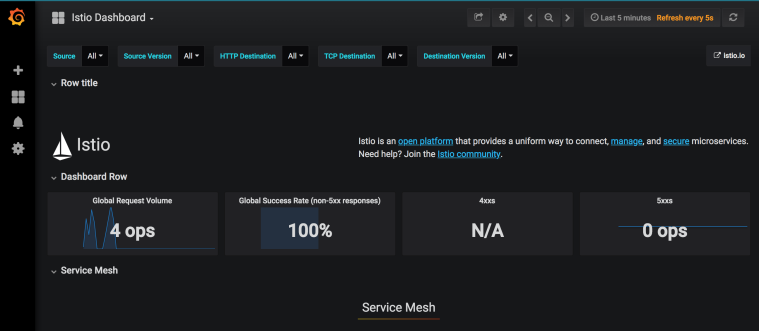
Grafana dashboard

There’s Grafana for dashboarding. Let’s setup port forwarding first:

kubectl -n istio-system port-forward $(kubectl -n istio-system get pod -l app=grafana -o jsonpath='{.items[0].metadata.name}') 8080:3000

Navigate to http://localhost:8080 to see the dashboard:

Istio Dashboard in Grafana

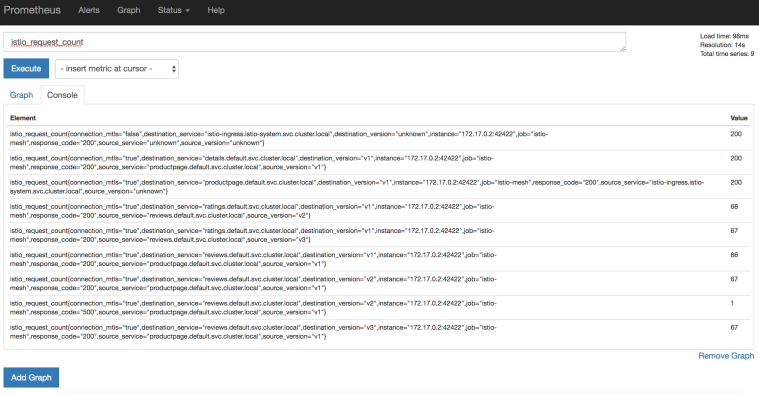
Prometheus metrics

Next, let’s take a look at Prometheus for metrics. Set port forwarding:

kubectl -n istio-system port-forward $(kubectl -n istio-system get pod -l app=prometheus -o jsonpath='{.items[0].metadata.name}') 8083:9090

Navigate to http://localhost:8083/graph to see Prometheus:

Prometheus in Istio

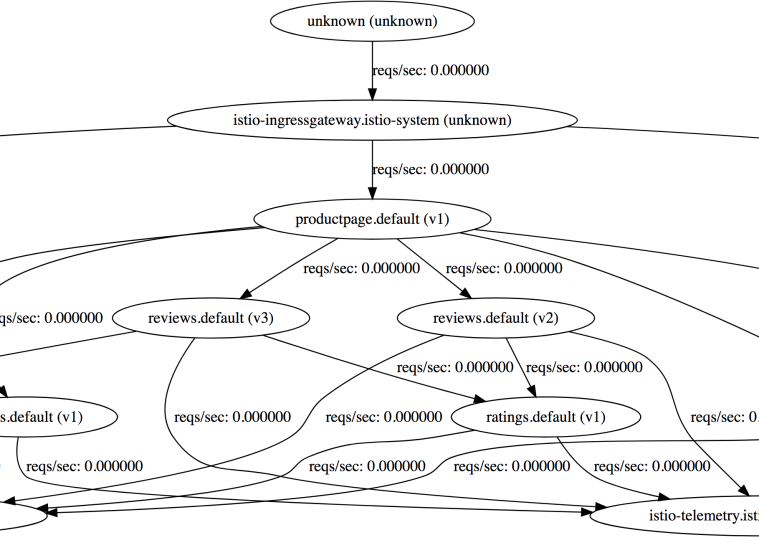
ServiceGraph

For dependency visualization, we can take a look at ServiceGraph:

kubectl -n istio-system port-forward $(kubectl -n istio-system get pod -l app=servicegraph -o jsonpath='{.items[0].metadata.name}') 8082:8088

Navigate to http://localhost:8082/dotviz:

Screen Shot 2018-06-07 at 10.02.38 AM.png

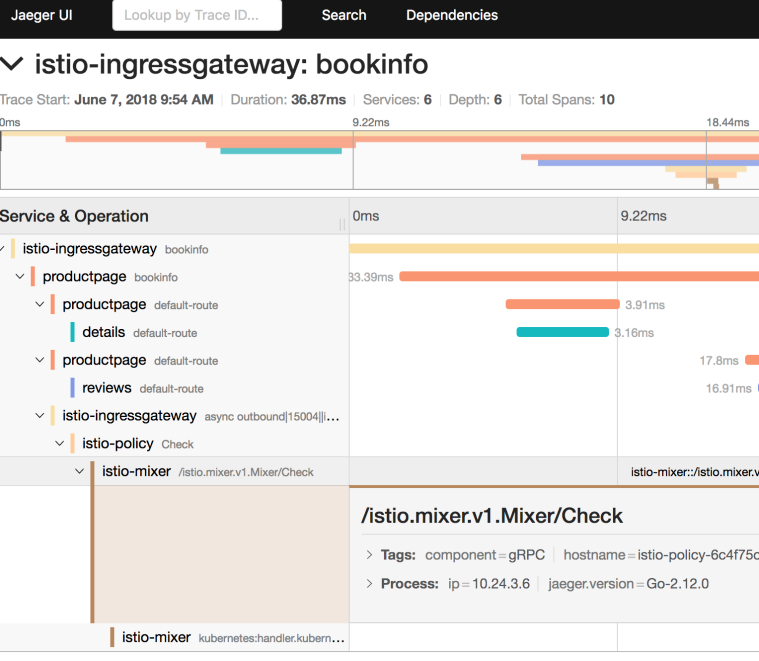
Tracing

For HTTP tracing, there is Jaegar and Zipkin. Let’s take a look at Jaeger. Setup port forwarding as usual:

kubectl port-forward -n istio-system $(kubectl get pod -n istio-system -l app=jaeger -o jsonpath='{.items[0].metadata.name}') 8084:16686

Navigate to http://localhost:8084

Screen Shot 2018-06-07 at 10.05.11 AM

Traffic Management

Before you can use Istio to control the Bookinfo version routing, you need to define the available versions, called subsets, in destination rules. Run the following command to create default destination rules for the Bookinfo services:

kubectl apply -f samples/bookinfo/networking/destination-rule-all-mtls.yaml

You can then see the existing VirtualServices and DestinationRules like this:

kubectl get virtualservices -o yaml
kubectl get destinationrules -o yaml

When you go to the product page of BookInfo application and do a browser refresh a few times, you will see that the reviews section on the right keeps changing (the stars change color). This is because there are 3 different reviews microservices and everytime, a different microservice is invoked. Let’s pin all microservices to version1:

kubectl apply -f samples/bookinfo/networking/virtual-service-all-v1.yaml

This creates VirtualServices and DestinationRules needed to pin all microservices to version1. Now, if you back to the product page and do a browser refresh, nothing changes because reviews microservice is pinned to version1 now.

To pin a specific user (eg. Jason) to a specific version (v2), we can do the following:

kubectl apply -f samples/bookinfo/networking/virtual-service-reviews-test-v2.yaml

With this rule, if you login to the product page with username “Jason”, you should see the v2 version of reviews microservice.

To clean up all destination rules, run the following and now we’re back to the beginning with 3 different versions of the microservices:

kubectl delete -f samples/bookinfo/networking/virtual-service-all-v1.yaml

Cleanup

This wraps up all the basic functionality of Istio 1.0.0 that I wanted to show on GKE. To cleanup, let’s first delete the BookInfo app:

kubectl delete -f samples/bookinfo/networking/bookinfo-gateway.yaml
kubectl delete -f samples/bookinfo/platform/kube/bookinfo.yaml

Confirm that BookInfo app is gone:

kubectl get gateway
kubectl get virtualservices
kubectl get pods

Finally, cleanup Istio:

kubectl delete -f install/kubernetes/istio-demo.yaml

Confirm that Istio is gone:

kubectl get pods -n istio-system

.NET Days in Zurich, Shift Conf in Split

Last week was a quite interesting week in terms of travel. First I got to visit Zurich again after a while for .NET Day and then I got to visit the Croatian coastal town Split for the first time for Shift Conference.

.NET Days in Zurich

When I used to work at Adobe, part of my team was based in Basel, Switzerland. As a result, I used to visit Basel, Zurich and other Swiss cities quite often. Since I left Adobe, I visited Switzerland only once 2 years ago. I was naturally excited to visit Zurich again for .NET Day.

I arrived a day early for the conference and explored Zurich a little bit. Google has a big office in Zurich with strong engineering. I got to visit that office as well for the first time and spent half day there working from the office.

Talk & Questions

.NET Day is a small .NET focused conference with 2 tracks and about 200 attendees. It was the first time presenting there. I did my “Google Home meets .NET Containers” talk where I show how to connect Google Home mini to a .NET container running in Google Cloud. It’s a fun talk and always get a good reaction from the crowd.

Conference organizers did a couple of special things for speakers. First, we got speaker t-shirts with our names on it. I think this was the first time I got a t-shirt with my name which was nice. Second, they organized a photo shoot with the conference photographer, Irene Bizic. She did an amazing job and as a result, I got a few very nice pictures of myself.

After my talk, I got some questions on the pricing model of Vision API. Someone also asked me about how to test Dialogflow end to end.

Shift Conference in Split

After Zurich, I flew to Split, Croatia. As you might remember, I was in Zagreb, the Croatian capital last October but this was the first time I got to visit the coastal part of Croatia.

I have to say I was impressed with Split. It’s a small town with rich history, great food and good beaches. The weather was very good with 30 degrees and sunny almost every day. I tried food in 3-4 different places and every place was very good. I had opened the beach season back in January in Rio but it had been a while since then and it was nice to swim again one afternoon in Split.

Talk & Questions

This was the first time I spoke at Shift Conference. I was expecting a small conference in a small town but I was totally wrong. Shift is a big well-organized conference (1000+ attendees) with a single track (and a workshop) over 2 days. There were lots of speakers from all over the place, a ton of technical content. The conference happens in an old theatre kind of place and I was super impressed with the stage. It was probably the most impressive stage I ever spoke at.

I did my “Google Home meets .NET containers” talk again. It was super fun again and I got reaction from the crowd both during and after my talk. After the conference, I got some general questions about Google Cloud and Dialogflow.

I have to say the organizers did an amazing job with the conference. There were speaker dinners and parties every night and they really tried to make it a fun event not just for attendees but for speakers as well.

I hope to visit Split again next year and explore more of Croatia and surroundings.

Istio 101 (0.8.0) on GKE

In one of my previous posts, I showed how to install Istio on minikube and deploy the sample BookInfo app. A new Istio version is out (0.8.0) with a lot of changes, especially changes on traffic management, which made my steps in the previous post a little obsolete.

In this post, I want to show how to install Istio 0.8.0 on Google Kubernetes Engine (GKE), deploy the sample BookInfo app and show some of the add-ons and traffic routing.

Create Kubernetes cluster

First, we need a Kubernetes cluster to install Istio. On GKE, this is a single command:

gcloud container clusters create hello-istio \
 --cluster-version=latest \
 --zone europe-west1-b \
 --num-nodes 4

I’m using 4 worker nodes. That’s the recommended number of nodes for BookInfo sample.

Once the cluster is created, we also need to create a clusterrolebinding for Istio to be able to manage the cluster:

kubectl create clusterrolebinding cluster-admin-binding \
 --clusterrole=cluster-admin \
 --user=$(gcloud config get-value core/account)

Download & Setup Istio

Now that we have a cluster, let’s download the latest Istio (0.8.0 as of today):

curl -L https://git.io/getLatestIstio | ISTIO_VERSION=0.8.0 sh -

Add Istio’s command line tool istioctl to your PATH. We’ll need it later:

export PATH="$PATH:./istio-0.8.0/bin"

Install Istio

It’s time to install Istio with mutual authentication between sidecars:

kubectl apply -f install/kubernetes/istio-demo-auth.yaml

Once it’s done, you can check that pods are running under istio-system namespace:

kubectl get pods -n istio-system

You’ll realize that in addition to Istio base components (eg. pilot, mixer, ingress, egress), a number of add-ons are also installed (eg. prometheus, servicegraph, grafana). This is different from the previous versions of Istio.

Enable sidecar injection

When we configure and run the services, Envoy sidecars can be automatically injected into each pod for the service. For that to work, we need to enable sidecar injection for the namespace (‘default’) that we will use for our microservices. We do that by applying a label:

kubectl label namespace default istio-injection=enabled

And verify that label was successfully applied:

kubectl get namespace -L istio-injection

Deploy BookInfo app

Let’s deploy the BookInfo sample app now:

kubectl apply -f samples/bookinfo/kube/bookinfo.yaml

And make sure all the pods are running. Notice that there are 2 pods for each service (1 the actual service and 1 sidecar):

kubectl get pods

Deploy BookInfo Gateway

In Istio 0.8.0, traffic management completely changed and one of those changes is that you need to create a gateway for ingress traffic. Let’s go ahead and create a gateway for BookInfo app:

istioctl create -f samples/bookinfo/routing/bookinfo-gateway.yaml

Use BookInfo app

We can finally take a look at the app. We need to find ingress gateway IP and port:

kubectl get svc istio-ingressgateway -n istio-system

To make it easier for us, let’s define a GATEWAY_URL variable:

export INGRESS_HOST=$(kubectl -n istio-system get service istio-ingressgateway -o jsonpath='{.status.loadBalancer.ingress[0].ip}')
export INGRESS_PORT=$(kubectl -n istio-system get service istio-ingressgateway -o jsonpath='{.spec.ports[?(@.name=="http")].port}')
export GATEWAY_URL=$INGRESS_HOST:$INGRESS_PORT

Let’s see if the app is working. You should get 200 with curl:

curl -o /dev/null -s -w "%{http_code}\n" http://${GATEWAY_URL}/productpage

You can also open a browser and see the web frontend for product page. At this point, we got the app deployed and managed by a basic installation of Istio.

Next, we’ll take a look at some of the add-ons. Unlike previous versions, add-ons are automatically installed already. Let’s start sending some traffic first:

for i in {1..100}; do curl -o /dev/null -s -w "%{http_code}\n" http://${GATEWAY_URL}/productpage; done

Grafana dashboard

There’s Grafana for dashboarding. Let’s setup port forwarding first:

kubectl -n istio-system port-forward $(kubectl -n istio-system get pod -l app=grafana -o jsonpath='{.items[0].metadata.name}') 8080:3000

Navigate to http://localhost:8080 to see the dashboard:

Istio Dashboard in Grafana

Prometheus metrics

Next, let’s take a look at Prometheus for metrics. Set port forwarding:

kubectl -n istio-system port-forward $(kubectl -n istio-system get pod -l app=prometheus -o jsonpath='{.items[0].metadata.name}') 8083:9090

Navigate to http://localhost:8083/graph to see Prometheus:

Prometheus in Istio

ServiceGraph

For dependency visualization, we can take a look at ServiceGraph:

kubectl -n istio-system port-forward $(kubectl -n istio-system get pod -l app=servicegraph -o jsonpath='{.items[0].metadata.name}') 8082:8088

Navigate to http://localhost:8082/dotviz:

Screen Shot 2018-06-07 at 10.02.38 AM.png

Tracing

For HTTP tracing, there is Jaegar and Zipkin. Let’s take a look at Jaeger. Setup port forwarding as usual:

kubectl port-forward -n istio-system $(kubectl get pod -n istio-system -l app=jaeger -o jsonpath='{.items[0].metadata.name}') 8084:16686

Navigate to http://localhost:8084

Screen Shot 2018-06-07 at 10.05.11 AM

Traffic Management

Traffic Management changed dramatically in 0.8.0. You can read more about it here but basically instead of routing rules, we now have VirtualServices and DestinationRules.

You can see the existing VirtualServices and DestinationRules like this:

istioctl get virtualservices -o yaml
istioctl get destinationrules -o yaml

When you go to the product page of BookInfo application and do a browser refresh a few times, you will see that the reviews section on the right keeps changing (the stars change color). This is because there are 3 different reviews microservices and everytime, a different microservice is invoked. Let’s pin all microservices to version1:

istioctl create -f samples/bookinfo/routing/route-rule-all-v1-mtls.yaml

This creates VirtualServices and DestinationRules needed to pin all microservices to version1. Now, if you back to the product page and do a browser refresh, nothing changes because reviews microservice is pinned to version1 now.

To pin a specific user (eg. Jason) to a specific version (v2), we can do the following:

istioctl replace -f samples/bookinfo/routing/route-rule-reviews-test-v2.yaml

With this rule, if you login to the product page with username “Jason”, you should see the v2 version of reviews microservice.

To clean up all destination rules, run the following and now we’re back to the beginning with 3 different versions of the microservices:

istioctl delete -f samples/bookinfo/routing/route-rule-all-v1.yaml

Cleanup

This wraps up all the basic functionality of Istio 0.8.0 that I wanted to show on GKE. To cleanup, let’s first delete the BookInfo app:

samples/bookinfo/kube/cleanup.sh

Confirm that BookInfo app is gone:

istioctl get gateway
istioctl get virtualservices
kubectl get pods

Finally, cleanup Istio:

kubectl delete -f install/kubernetes/istio-demo.yaml

Confirm that Istio is gone:

kubectl get pods -n istio-system

Codemotion in Amsterdam, Devoxx in London

After my trip in Istanbul, I visited my parents in Nicosia, Cyprus for a long weekend. Then, I stopped by in Amsterdam for Codemotion before coming back to London for Devoxx. 4 cities in 4 countries in 1 week was exhausting but also a lot of fun in many ways.

Codemotion Amsterdam

Amsterdam is almost a second home to me nowadays. There’s a great tech scene and a lot of tech events throughout the year, as a result, I end up visiting Amsterdam at least 2-3 times a year.

Codemotion is a European tech conference that happens in many locations. As you might remember, I spoke at Codemotion Rome earlier this year (trip report). This was my second time speaking at Codemotion Amsterdam. Last year, I spoke about gRPC and this year about Istio, both open source projects .

Codemotion Amsterdam is a mid-size conference, my guess is about 1000/1500 developers. I love the venue of Codemotion Amsterdam. It’s in an old factory kind of place, right next to the river. They did a great job with the venue decoration, lighting both last year and this year as well.

Talk & Questions

I did my usual Istio 101 talk to a group of about 100 developers. After my talk, I got the following questions:

  • How does Istio compare to Conduit? (apparently, Conduit is an Istio like project but I didn’t know much about it).
  • How can we have sticky sessions with Istio? (i.e. make sure certain users always go to the same pod).
  • Is it possible to have a message queue between services? This is a common pattern in microservices and a couple of people were wondering if this is possible in Istio.

Devoxx London

After Amsterdam, I arrived back to London for Devoxx UK. Even though I’m based in London, I don’t get to speak as much as I’d like in London, mainly due to my travels, so I was happy to be part of Devoxx UK.

Devoxx is another European conference that happens in places like Brussels, Krakow, Casablanca and London. It started as a Java conference but nowadays, it’s much more than just Java. I got to speak at Devoxx Brussels, Krakow and Casablanca in previous years but this was my first time speaking in Devoxx London.

As a side note, Devoxx Brussels is one of the best tech conferences I ever attended with great technical content, huge cinema like screens for previous and awesome attendees and speakers. In comparison, London is smaller but still a nice conference.

Talk & Questions

In Devoxx London, I did my Istio 101 talk again. It’s great to see so much interest in Istio from the community. The talk of the video is already online, so you can watch it here if you like:

After the talk, I got the following questions:

  • Kafka or some message queue between services: Again, people are curious about how to have an async architecture with message queues between services.
  • Zipkin add-on: Where does it save its data? If Istio is restarted, does the data persist?
  • Zipkin: Can we have it to look at our custom headers for tracing?
  • Pilot stability: What happens if Pilot does? Does the service mesh still work? Does Pilot’s state persist somewhere?